
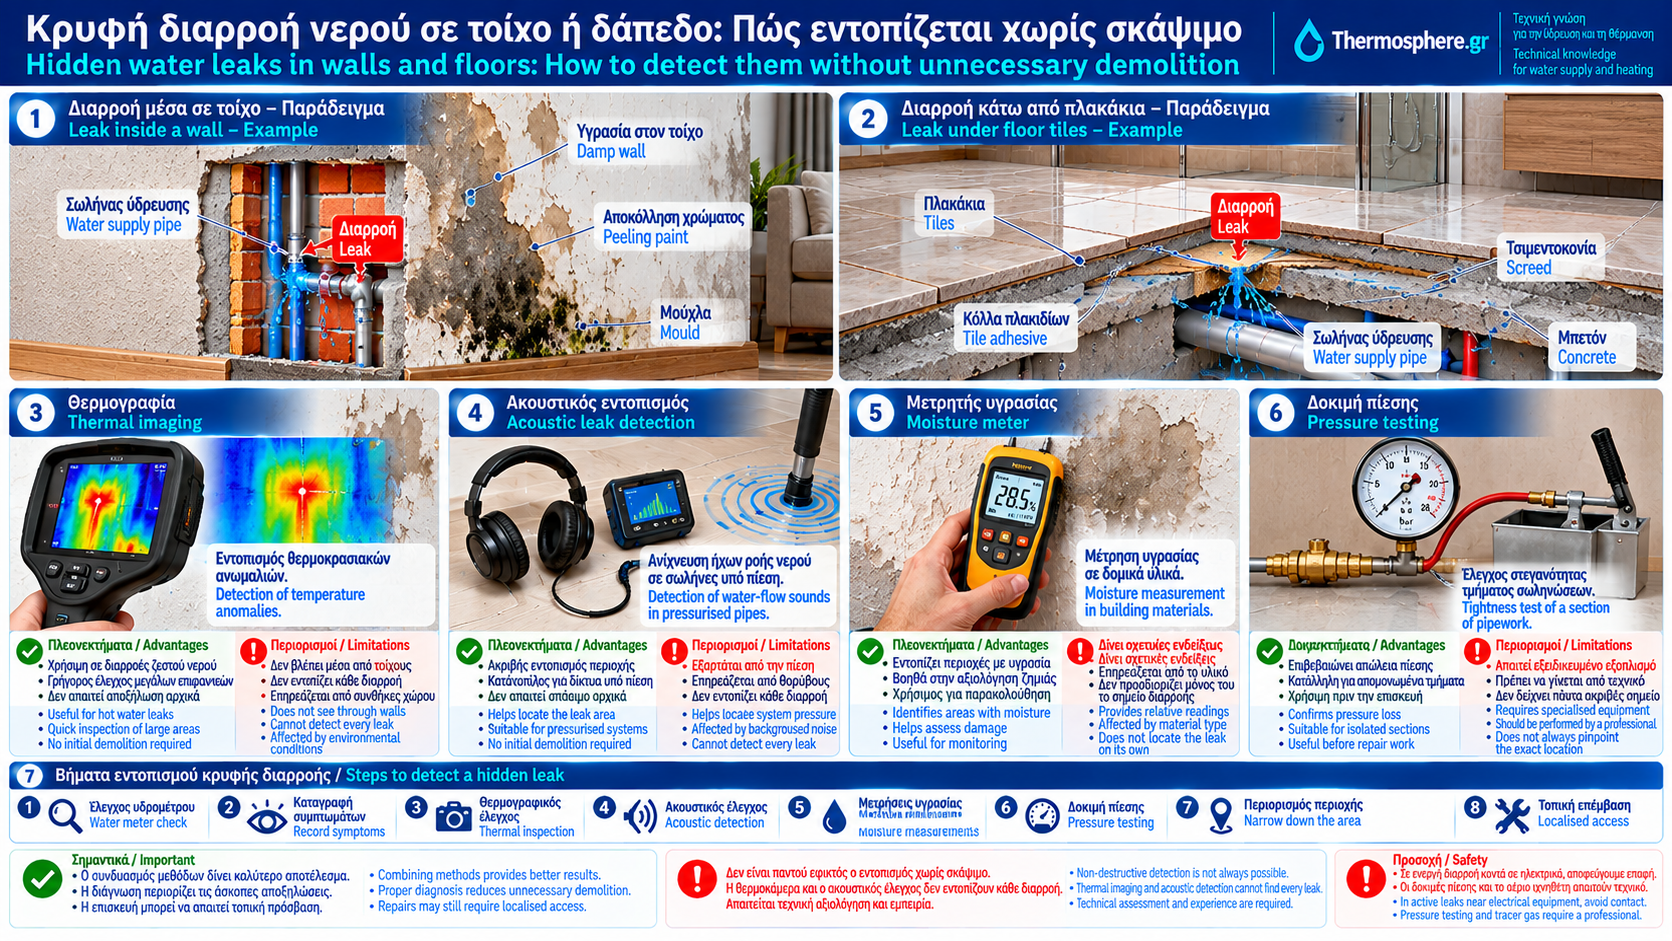
Hidden Water Leaks in Walls and Floors: How to Detect Them Without Unnecessary Demolition
A hidden water leak can damage a building for a considerable period before it becomes visible.
Water may escape from a pipe inside a wall, beneath floor tiles or within another inaccessible part of the plumbing installation.
The consequences are not limited to water loss. Persistent moisture can damage plaster, flooring and surrounding materials, encourage mould growth and affect neighbouring rooms.
Modern diagnostic methods can help locate concealed leaks without immediately opening walls or floors.
However, non-destructive detection does not necessarily mean that the final repair can be completed without any building work.
This Thermosphere.gr technical guide examines the warning signs, diagnostic methods and limitations involved in reliable hidden leak detection.
1. What Is a Hidden Water Leak?
A hidden water leak occurs when water escapes from a location that cannot be directly observed or accessed.
Examples include:
Pipes inside walls.
Pipework beneath floor tiles.
Pipes embedded in floor construction.
Concealed connections.
Pipes in service shafts or suspended ceilings.
Underground supply lines.
A leak may be continuous or intermittent.
Its behaviour depends on whether it affects a pressurised supply line, drainage pipe or another system.
2. Common Warning Signs
Typical symptoms include:
Persistent localised dampness.
Bubbling or peeling paint.
Deteriorating plaster.
Changes in tile grout.
Mould around walls or skirting boards.
Damp patches on ceilings below.
Unexplained increases in water consumption.
Water meter movement without known usage.
The visible wet area does not always identify the leak location.
Water can travel through cavities, joints and porous building materials before becoming visible.
3. Does a Damp Wall Always Mean a Pipe Leak?
No.
Moisture can originate from several different sources.
Water supply leaks: Escape from pressurised pipes or fittings.
Drainage leaks: Water escapes when a fixture or appliance is used.
Waterproofing failures: Water enters through shower areas, bathrooms, balconies or other surfaces.
Condensation: Water vapour condenses on surfaces under suitable temperature and humidity conditions.
Rainwater penetration: Water enters through external walls, roofs or openings.
Rising damp: Moisture migrates upward from the ground through porous construction materials.
Correct diagnosis requires identifying the likely source before selecting a repair method.
4. How to Check Whether the Supply System Is Leaking
A water meter test is a useful first step.
The procedure involves:
Stopping all known water use.
Checking that toilets, tanks and appliances are not filling.
Recording the meter reading.
Waiting without using water.
Comparing the readings.
An increase indicates that further investigation may be necessary.
It does not prove that a hidden pipe inside a wall is leaking.
A leaking toilet cistern can produce the same meter behaviour.
Drainage and waterproofing leaks may not be detected by this test.
5. Why You Should Not Immediately Break Open a Wall
Moisture can migrate through building materials.
Opening a wall exactly where a damp patch appears may fail to reveal the damaged pipe.
Unnecessary demolition can result in:
Larger repair areas.
Additional restoration work.
Higher costs.
Longer repair times.
Damage to other concealed services.
A suitable diagnostic approach can reduce the area requiring physical access.
6. Thermal Imaging for Leak Detection
A thermal camera measures infrared radiation emitted by surfaces and produces an image representing apparent surface temperature.
In some situations, leaking water changes the temperature distribution of a wall or floor.
These differences may help identify suspicious areas.
Where Can Thermal Imaging Help?
Certain hot water pipe leaks.
Floors with detectable temperature differences.
Moisture investigations under suitable conditions.
Surveys combined with other diagnostic methods.
Important Limitations
Thermal cameras:
Do not see through walls.
Do not directly image water inside building materials.
Cannot detect every leak.
Can be affected by sunlight, heating systems, reflections and other thermal influences.
A thermal anomaly is not conclusive proof of leakage.
It must be interpreted correctly and may require confirmation.
7. Acoustic Leak Detection
Water escaping from a pressurised pipe can generate sound and vibration.
Specialised acoustic instruments detect and amplify these signals.
A technician takes readings at different locations to identify areas where the leak-related signal may be strongest.
Advantages
Initial inspection may not require demolition.
Suitable for certain pressurised supply systems.
Can narrow down the search area.
Limitations
Effectiveness depends on:
Network pressure.
Leak size and type.
Pipe material.
Installation depth.
Environmental noise.
Wall or floor construction.
Some leaks produce signals too weak for reliable acoustic localisation.
8. Moisture Measurement in Walls and Floors
Moisture meters help assess moisture conditions in building materials.
Depending on the instrument, they may use electrical resistance, dielectric properties or other measurement principles.
They can assist with:
Identifying areas with elevated moisture readings.
Comparing different locations.
Monitoring changes over time.
Assessing drying progress.
Some non-invasive meters provide relative readings rather than absolute water content.
Results may be influenced by material composition, measurement depth, salts and metallic components.
9. Pressure Testing Plumbing Systems
Pressure testing assesses the tightness of an appropriately isolated section of pipework.
The procedure requires suitable equipment and must follow the requirements of the system.
It generally involves:
Isolating the section to be tested.
Preparing the pipework.
Applying the specified test pressure.
Monitoring measurements.
Evaluating the result.
Test pressure must not be chosen arbitrarily.
It depends on materials, equipment, manufacturer instructions and applicable requirements.
Pressure changes also require interpretation because temperature and other factors may affect readings.
Testing should be performed by suitably trained personnel.
10. Tracer Gas Leak Detection
In appropriate applications, a specialised tracer gas can be used.
The gas is introduced into an isolated and suitably prepared section of pipework.
If a leak exists, gas may escape through the defect and be detected using specialised instruments.
This technique can help when other methods provide inconclusive results.
However, success depends on the gas migration path, construction materials, site conditions and accessibility.
Gas selection, test pressure and procedures must follow equipment specifications and safety requirements.
This is not a do-it-yourself procedure.
11. Detecting Leaks Beneath Floor Tiles
Leak detection beneath tiles usually combines several types of information.
A technician may assess:
Known pipe routes.
Water meter readings.
Moisture distribution.
Thermal anomalies.
Acoustic signals.
Pressure test results.
The objective is to narrow down the likely location before opening the floor.
No single method guarantees exact localisation in every floor construction.
12. Damp Ceilings: Where Could the Water Come From?
When moisture appears on a ceiling, the source may be on the floor above.
Possible causes include:
Water supply leaks.
Drainage leaks.
Failed bathroom waterproofing.
Leaking appliances.
Water entering from outside.
The actual source may be some distance from the visible stain.
Severe ceiling deformation, detached materials or accumulated water require prompt safety assessment.
13. Can Hidden Leaks Be Repaired Without Demolition?
That depends on the location and type of failure.
Detection can often be carried out without extensive opening of building surfaces.
Repair may still require physical access to the defective component.
Possible solutions include:
Localised opening and pipe replacement.
Repair of an accessible fitting.
Rerouting a defective pipe section.
Replacing a larger section when multiple failures exist.
The appropriate solution depends on the condition and material of the plumbing network.
Temporary measures that do not reliably restore watertightness should not be treated as permanent repairs.
14. What Affects Leak Detection Costs?
Costs depend on factors including:
Property size.
Access to the plumbing system.
Network type.
Number of suspected locations.
Diagnostic methods required.
Isolation requirements.
Complexity of the fault.
Not every concealed leak can be located with a single measurement.
Diagnostic costs should also be distinguished from repair and restoration costs.
15. What to Do If You Suspect a Hidden Leak
Follow a structured approach:
Record where and when moisture appears.
Check the water meter without known consumption.
Inspect visible connections, toilets and appliances.
Avoid unnecessary demolition.
Isolate the supply if significant active leakage is present and it is safe to do so.
Arrange professional diagnosis.
After repair, verify that the leak has stopped and organise appropriate drying of affected materials.
If water is near electrical equipment, do not touch it or approach electrical panels through wet areas.
16. Frequently Asked Questions
Can a Hidden Leak Be Located Without Breaking Tiles?
In many cases, non-destructive methods can narrow down the suspected location. Repair may still require localised access.
Does a Thermal Camera Show Exactly Where a Pipe Is Broken?
Not necessarily. It displays surface temperature differences that require interpretation.
Can There Be a Leak Without Water Meter Movement?
Yes. Drainage and waterproofing leaks may not create continuous water meter consumption.
Why Does Dampness Appear Far From the Leak?
Water can travel through joints, cavities and porous building materials.
Which Detection Method Is Best?
There is no single best method for every situation. Selection depends on the plumbing system and the characteristics of the suspected failure.
When Is Immediate Action Necessary?
Urgent action is appropriate when there is substantial active leakage, electrical danger, serious building damage or a risk to neighbouring areas.
Conclusion
Hidden water leaks require systematic investigation.
Thermal imaging, acoustic detection, moisture measurements, pressure testing and tracer gas techniques can help narrow down suspected leak locations.
Selecting and combining the appropriate methods can reduce unnecessary demolition.
The objective is not merely to find dampness, but to identify the actual cause and carry out a reliable repair.
Technical References and Further Reading
EN 806: Specifications for installations inside buildings conveying water for human consumption.
EN 805: Water supply — Requirements for systems and components outside buildings.
ISO 6781-1: Performance of buildings — Detection of heat, air and moisture irregularities in buildings by infrared methods — General procedures.
ISO 18436-7: Condition monitoring and diagnostics of machines — Requirements for qualification and assessment of personnel — Thermography.
CEN-CENELEC: https://www.cencenelec.eu/
U.S. EPA WaterSense: https://www.epa.gov/watersense
These references cover related technical subjects and are not all dedicated specifically to domestic leak detection.
Safety note: Pressure testing and tracer gas procedures require suitable equipment and trained personnel. Water near electrical installations presents additional hazards.
Thermosphere.gr — Technical knowledge for water supply and heating systems.