
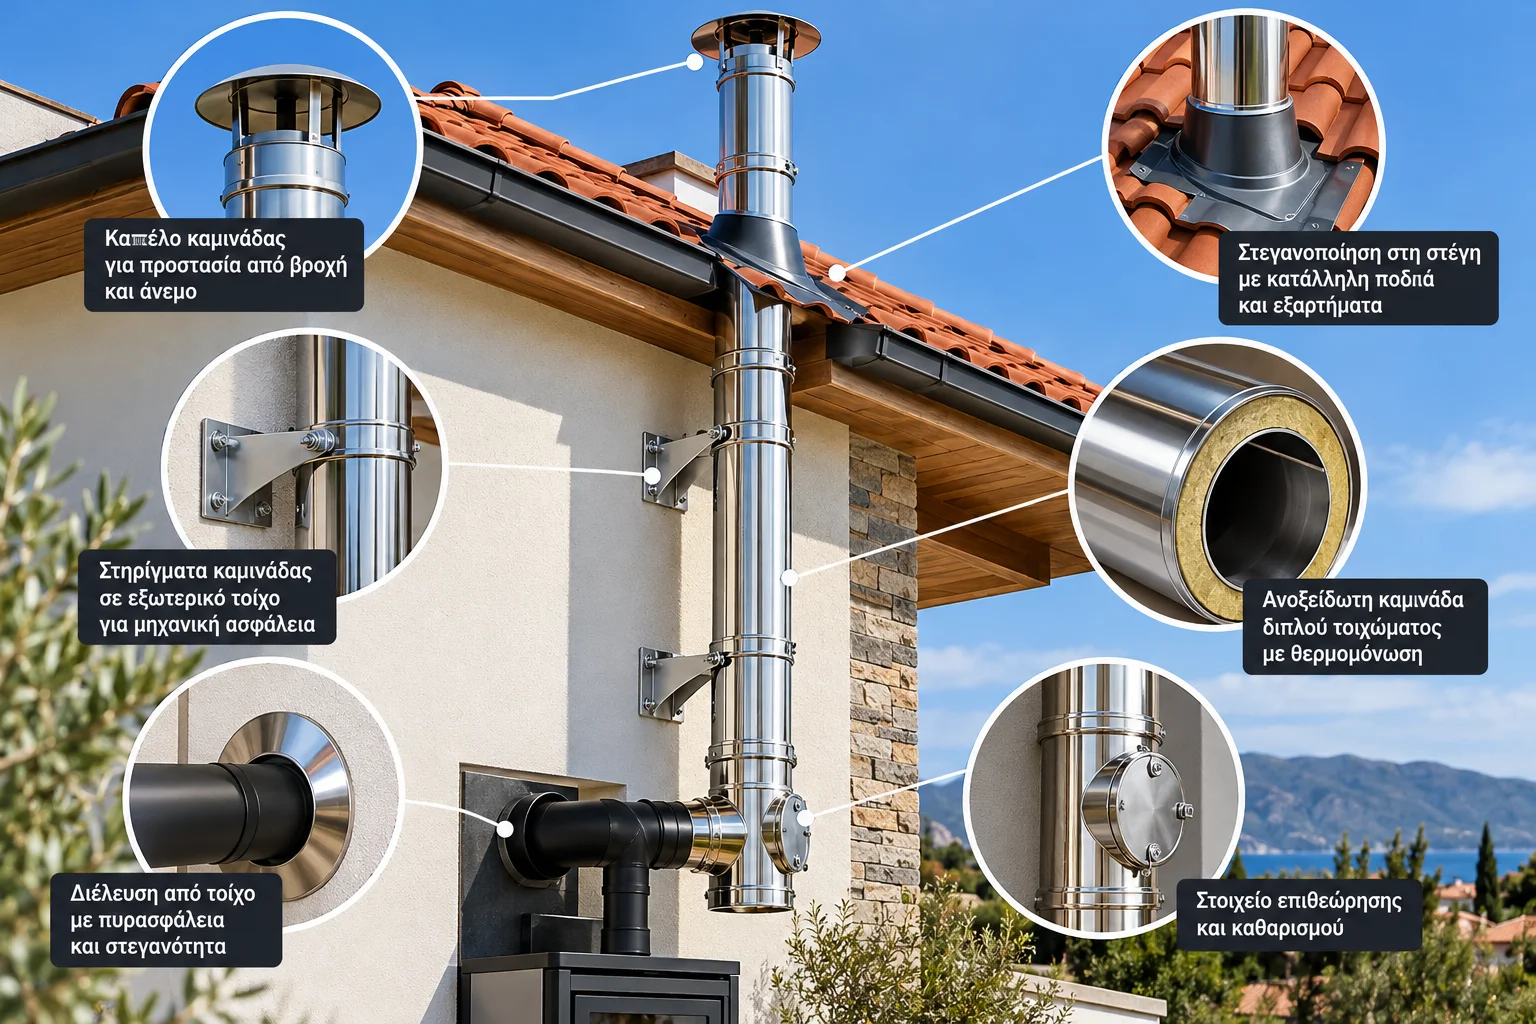
External Wall and Roof Chimney Installation: Supports, Insulation and Waterproofing
Chimney installation on an external wall or through a roof is a common solution for residential and commercial heating systems.
An external stainless steel chimney may be used when a building has no suitable internal chimney shaft or when a new flue route is required.
Similarly, a chimney passing through the roof may provide a relatively direct route for combustion gases to reach the outside atmosphere.
However, both configurations present important technical challenges.
Chimneys are exposed to temperature fluctuations, wind loads, rain and thermal expansion. At the same time, wall and roof penetrations must preserve the building's fire safety requirements and weather resistance.
Correct installation depends not only on chimney pipe quality but also on the complete design of the route, structural support, safety clearances and compatibility of all components.
This guide examines the essential considerations for external wall and roof chimney installations, including insulation, support brackets, roof flashing, chimney termination, wind effects and maintenance.
1. When Is an External Chimney the Right Choice?
An external chimney is often a practical option when an internal route is unavailable or unsuitable.
Typical applications include:
Installing a new wood-burning stove in an existing house.
Replacing an old or unsuitable chimney.
Adding a pellet stove.
Upgrading a heating installation.
Working in a building without a suitable internal chimney shaft.
Avoiding extensive internal building alterations.
However, an external route is not automatically suitable for every heating appliance.
Flue gas temperature, operating pressure, chimney diameter and termination location must all be evaluated.
The chimney must also be compatible with the appliance manufacturer's requirements.
2. External vs Internal Chimney Installation
Both configurations have advantages and limitations.
External Chimney Route
An external route may provide easier access to certain chimney sections and reduce the need for major interior construction work.
However, it is exposed to:
Low outdoor temperatures.
Rain and moisture.
Wind.
Temperature fluctuations.
Potentially corrosive environmental conditions.
These factors can influence the thermal behaviour, structural requirements and service life of the chimney system.
Internal Chimney Route
An internal chimney may experience less cooling because a greater proportion of the flue is located within the building's thermal envelope.
However, it requires particular attention at:
Floor penetrations.
Fire compartments.
Structural elements.
Combustible materials.
Inspection and maintenance access points.
The final choice should result from an overall technical assessment rather than installation convenience alone.
3. Why Are Insulated Twin-Wall Chimneys Commonly Used Outdoors?
Certified insulated twin-wall systems are frequently selected for external installations.
A typical twin-wall chimney consists of:
An inner metal flue liner.
A thermal insulation layer.
An outer metal casing.
The insulation can reduce flue gas cooling and help maintain the operating conditions required by the appliance.
This may be particularly important for natural-draft heating systems.
However, other factors must also be considered, including operating pressure, condensation and corrosion resistance.
A twin-wall chimney does not automatically permit direct contact with wood or other combustible materials.
The required clearances must follow the classification and installation instructions of the specific chimney system.
4. How Should an External Chimney Route Be Designed?
Chimney design begins with the technical characteristics of the heating appliance.
The following information should be established:
Fuel type.
Flue gas temperature.
Flue gas mass flow.
Required operating pressure or draft.
Appliance outlet diameter.
Manufacturer installation restrictions.
The appliance location, wall exit and vertical chimney route can then be assessed.
The objective is to create an appropriate flue path without unnecessary changes of direction.
Adequate access for inspection and cleaning must also be included.
Components should be selected as part of a compatible system rather than assembled from unrelated pipes, fittings and supports.
5. Supporting a Chimney on an External Wall
Mechanical support is a fundamental safety consideration.
An external chimney is subjected to loads arising from:
Its own weight.
Wind pressure and suction.
Temperature changes.
Forces at supporting points.
Additional environmental conditions.
Support components must be suitable for the specific chimney system and installation geometry.
Load-Bearing Support Brackets
Support brackets transfer the loads specified by the system design and manufacturer.
Their position and load capacity must be evaluated in relation to the supporting building structure.
Wall Bands and Spacers
Wall bands and spacers help maintain the chimney's alignment and lateral stability.
However, not every wall band is designed to carry vertical loads.
The function of each component must be confirmed from the manufacturer's documentation.
Structural Anchors
Anchors must be suitable for the substrate.
Solid structural concrete, hollow masonry and external insulation systems have different mechanical properties.
External wall insulation is not, by itself, a suitable load-bearing substrate for chimney supports.
Where necessary, the support arrangement must transfer loads to an appropriate structural element through an approved fixing solution.
6. How Far Apart Should Chimney Support Brackets Be?
There is no universal spacing between support brackets that applies to every chimney.
Permitted spacing depends on:
Chimney diameter.
Component weight.
Joint design.
Overall chimney height.
Wind loading.
Permitted unsupported height.
Manufacturer instructions.
Maximum support distances and allowable loads must be taken from the technical documentation of the specific system.
Particularly exposed installations may require additional structural assessment.
7. Thermal Expansion: Why Must It Be Considered?
Metal chimney components experience temperature changes during operation.
These changes cause thermal expansion and contraction.
In long vertical installations, the resulting movement may be significant for joints and support points.
If a chimney is restrained in a way that prevents its intended movement, undesirable mechanical stresses may develop.
Conversely, insufficient restraint can compromise structural stability.
The installation must follow the manufacturer's requirements regarding support locations, permitted movement and joint configuration.
8. Chimney Penetration Through an External Wall
A wall penetration is a critical part of the installation, especially where combustible materials or composite wall systems are present.
Important considerations include:
Wall construction.
Flue temperature.
Required clearance from combustibles.
Fire protection of the penetration.
Weather and air tightness.
Mechanical independence of components.
It is not acceptable to simply create an opening and fill the surrounding space with an arbitrary insulation material.
A suitable, documented wall penetration detail is required.
The exact configuration must match the chimney system and the wall construction.
9. Installing a Chimney Through a Roof
A roof penetration must combine thermal safety with effective waterproofing.
The roof structure may contain:
Load-bearing elements.
Timber framing.
Thermal insulation.
Membranes.
Roof coverings.
Waterproofing components.
The design must ensure that the required clearances from combustible materials are maintained throughout the penetration.
It must also accommodate the chimney's intended thermal movement.
Any modification to structural roof components should be assessed by an appropriately qualified professional.
10. Chimney Roof Flashing and Waterproofing
Waterproofing around a chimney penetration prevents unwanted rainwater entry into the building.
The appropriate solution depends on:
Roof covering material.
Roof pitch.
Chimney diameter and geometry.
Temperature of the chimney's outer surface.
Rain and wind exposure.
System requirements.
Roof Flashing Components
Depending on the application, suitable roof flashing assemblies may include formed metal components, compatible weatherproof collars and other dedicated penetration accessories.
The selected components must be compatible with both the chimney and the roof construction.
Why Is Ordinary Silicone Not Enough?
Applying a bead of ordinary sealant around the chimney is not, by itself, a complete waterproofing solution.
Movement, temperature changes, ultraviolet exposure and prolonged contact with water can affect sealant performance.
Waterproofing should form part of a properly designed roof penetration detail.
11. Chimney Installation Through a Tiled Roof
Tiled roofs present particular challenges because of tile geometry and overlapping construction.
The chimney penetration must preserve the intended drainage path.
At the same time, fire safety requirements near timber roof components must not be compromised.
The installation must address both external waterproofing and the internal safety requirements of the penetration.
An unsuitable flashing detail may allow rainwater to travel beneath the tiles and enter the roof structure.
12. Chimney Installation Through a Flat Roof
On a flat roof, chimney waterproofing must integrate with the existing roof membrane system.
The penetration should be designed to avoid creating vulnerable points where water can enter.
Important considerations include:
Continuity of the waterproofing layer.
Rainwater drainage.
Thermal movement.
Mechanical stability.
Resistance to external weather conditions.
Solutions relying solely on a temporary sealant coating should be avoided.
The detail must remain suitable throughout the expected service conditions.
13. How Does Wind Affect Chimney Draft?
Wind can significantly influence the pressure conditions at a chimney outlet.
Its effect depends on:
Chimney termination location.
Roof geometry.
Nearby building heights.
Surrounding obstacles.
Wind direction and speed.
Certain locations may experience unfavourable pressure zones or air recirculation.
These conditions can interfere with chimney draft and, in some cases, contribute to smoke entering the building.
Can an Anti-Downdraft Chimney Cap Solve the Problem?
A suitable terminal may form part of the solution if it is permitted by the chimney system and heating appliance.
However, a chimney cap cannot correct every problem caused by an unsuitable termination location or incorrect chimney sizing.
Terminal selection should be based on technical compatibility and the actual cause of the problem.
14. Where Should a Chimney Terminate Above the Roof?
The chimney outlet position influences flue gas dispersion and pressure conditions.
The appropriate termination location depends on:
Appliance type.
Flue system design.
Roof pitch and geometry.
Nearby obstructions.
Building openings.
Applicable technical requirements.
There is no single height or clearance that covers every chimney installation.
The termination must be positioned according to the appliance and chimney manufacturers' instructions and the relevant regulations.
15. Why Does an External Chimney Develop Condensation?
Exposure to outdoor temperatures can increase flue gas cooling.
When conditions favour water vapour condensation, liquid may form inside the chimney.
The likelihood depends on:
Flue gas temperature.
Fuel type.
Thermal insulation.
Chimney route length.
Appliance operating conditions.
The chimney's suitability for wet operation.
Condensation does not have the same solution in every installation.
The system must be assessed to determine whether it is designed for wet or dry operation and whether suitable condensate management is required.
16. Why Does the Exterior Wall Turn Black Around a Chimney?
Black marks on an external wall near a chimney can have several causes.
Possible explanations include:
Soot deposition from combustion gases.
Unsuitable chimney termination location.
Flue gas recirculation caused by wind.
Leakage at a flue joint.
Contamination from condensate.
Other environmental deposits.
The location and appearance of the stains may provide useful diagnostic information, but they are not sufficient for a definitive conclusion.
Black Stains Near the Chimney Outlet
These may be associated with flue gas dispersion and local wind conditions.
Black Stains Around Pipe Joints
The installation should be checked for possible flue gas leakage or other faults.
Dark Streaks Associated With Moisture
These may indicate liquids carrying combustion deposits or other contaminants.
Cleaning the wall without identifying the cause is not a permanent solution.
If flue gas leakage is suspected, the appliance should not be used until the system has been professionally assessed.
17. Why Is Water Dripping Around a Chimney Penetration?
Water found near a chimney does not always have the same origin.
It may result from:
Rainwater entering through defective flashing.
Water passing through unsuitable roof details.
Condensation forming inside the flue.
Moisture travelling through building materials.
Diagnosis must distinguish roof leakage from condensation within the flue gas system.
These problems require different technical solutions.
A waterproofing repair will not necessarily resolve condensation, and condensate management will not correct defective roof flashing.
18. Clearances From Combustible Materials
Installing a chimney near timber, insulation or other combustible materials requires particular care.
Safety clearances depend on:
Chimney classification.
Temperature class.
Soot-fire resistance where required.
Manufacturer instructions.
Applicable installation requirements.
A certified twin-wall chimney must not automatically be considered safe for direct contact with timber.
Similarly, required clearance spaces around penetrations must not be filled with arbitrary materials.
The installation detail must comply with the tested and documented requirements of the specific system.
19. How Are Suitable Chimney Components Selected?
A complete installation may include:
Straight chimney sections.
Elbows.
Connecting components.
Load-bearing support brackets.
Wall bands.
Wall spacers.
Inspection components.
Wall and roof penetration accessories.
Roof flashing assemblies.
Chimney terminals.
The exact combination depends on the route and system requirements.
All components must be mutually compatible.
Products from different manufacturers should not be combined unless their compatibility is properly documented.
20. The 10 Most Common Chimney Installation Mistakes
1. Selecting an Unsuitable Chimney
The product may not meet the required temperature, pressure or fuel compatibility specifications.
2. Inadequate Mechanical Support
The installation may not safely withstand the expected loads.
3. Fixing Brackets Only to External Insulation
An insulation system must not be treated as a load-bearing structure.
4. Ignoring Thermal Expansion
Temperature changes can create unwanted mechanical stresses.
5. Incorrect Penetration Through a Timber Roof
Failure to maintain the required clearances can create a serious fire hazard.
6. Improvised Roof Waterproofing
Ordinary sealant does not replace a suitable roof penetration and flashing detail.
7. Incorrect Chimney Termination Position
An unsuitable outlet location may affect flue gas dispersion and draft.
8. An Unnecessarily Complex Flue Route
Multiple changes of direction increase pressure losses.
9. Insufficient Cleaning Access
Inspection and maintenance become more difficult and may be neglected.
10. Ignoring Moisture or Soot Stains
Visible deterioration may indicate waterproofing defects or operating problems.
21. What Should Be Checked Before First Operation?
After installation, the required checks should be performed by an appropriately qualified professional.
Depending on the application, these may include:
Suitability of the chimney system.
Correct sizing.
Mechanical support.
Fire safety clearances.
Wall and roof penetrations.
Weatherproofing.
Joint integrity.
Termination position.
Inspection accessibility.
Flue gas evacuation performance.
The heating appliance should not enter normal service until the required commissioning and safety checks have been completed.
22. Which European Standards Are Relevant?
Depending on the chimney product and application, relevant standards include:
EN 1443: General chimney requirements and classification.
EN 1856-1: Requirements for metal chimney system products.
EN 1856-2: Requirements for metal flue liners and connecting flue pipes.
EN 13384-1: Thermal and fluid dynamic calculation methods for chimneys serving one appliance.
EN 15287-1: Design, installation and commissioning of chimneys within the standard's scope.
Manufacturer instructions, building requirements and applicable national regulations must also be considered.
Frequently Asked Questions
Is an Insulated Twin-Wall Chimney Better for External Installation?
In many applications, an insulated twin-wall system is a suitable choice because of its thermal characteristics.
However, compatibility must be confirmed for the specific appliance and installation route.
Can a Chimney Be Supported by External Wall Insulation?
External insulation must not be treated as a load-bearing support.
A suitable anchoring solution must transfer the loads to an appropriate structural substrate.
How Far Apart Should Chimney Wall Brackets Be Installed?
Spacing depends on the system, diameter, expected loads and manufacturer instructions.
There is no universal spacing requirement for all chimneys.
How Is a Chimney Waterproofed on a Tiled Roof?
A suitable penetration detail and compatible flashing components must be used to preserve rainwater drainage and maintain the required fire safety clearances.
Why Is Water Dripping Next to My Chimney?
The cause may be rainwater penetration or condensation.
The source must be identified before selecting the appropriate repair.
Can Wind Cause Chimney Downdraft?
Yes. Roof geometry, chimney termination location and nearby obstructions can influence pressure conditions and contribute to downdraft.
Why Is the Exterior Wall Becoming Black?
Possible causes include soot deposition, flue gas recirculation, leakage at a joint or contaminants carried by moisture.
Should a Chimney Be Inspected After Strong Winds?
If the chimney has experienced severe wind exposure or shows visible movement, damage or loose components, it should be professionally inspected before further use.
Can Ordinary Silicone Be Used Around a Roof Chimney?
Ordinary sealant alone does not replace a suitable waterproofing and fire-safe roof penetration system.
Conclusion
Installing a chimney on an external wall or through a roof requires a complete technical approach.
Correct chimney selection must be combined with suitable structural support, allowance for thermal expansion, appropriate insulation and safe penetrations.
Roof waterproofing, chimney termination location and wind effects are also important considerations.
Visible warning signs such as moisture, black stains or movement of chimney components should never be ignored.
A reliable external chimney installation depends on compatible certified components, appropriate engineering design, correct installation and regular professional inspection.
Technical References
EN 1443 — Chimneys: General requirements.
EN 1856-1 — Chimneys: Requirements for metal chimneys — Part 1: System chimney products.
EN 1856-2 — Chimneys: Requirements for metal chimneys — Part 2: Metal flue liners and connecting flue pipes.
EN 13384-1 — Chimneys: Thermal and fluid dynamic calculation methods — Part 1.
EN 15287-1 — Chimneys: Design, installation and commissioning — Part 1.
The final installation must comply with the applicable editions of relevant standards, manufacturer instructions and national building requirements.